design
A little interface animation fun
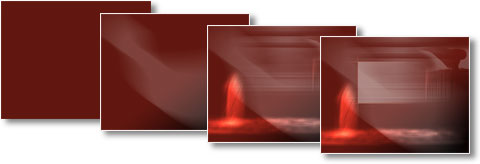
I had a real urge to make a little Silverlight interface animation in Blend. I wanted to create a background in Photoshop from layers of images and blending effects and then have a text area appear over the top. I guess I was influenced by game/DVD screens and the like. Because it was a fun project, I wasn't looking to spend too much time to achieve the rough effect I was after, with a hope that it could be refined at a later date.
View silverlight interface animation
The Photoshop background
I created the background in Photoshop, selecting a colour and then using photos from my own library and manipulating them using blur techniques and different blending mode options to build the image. I then built the little area that would house any text messages that might come through. I sampled a colour generated by the blending options for the text screen 'frame'.
Into Blend
In order to maintain the blending effects, I flattened the layers that held the images and background colours. I kept the 'text screen' in a separate layer group, saved the file, and imported it into Blend. I could have re-created the text screen in Blend - probably a sensible option were I to do more with the project - but for sake of laziness, I decided to animate the photoshop layers.
Adding some text
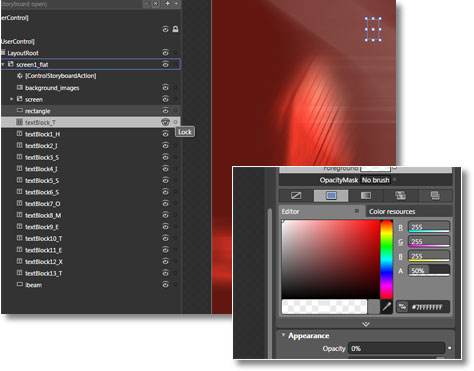
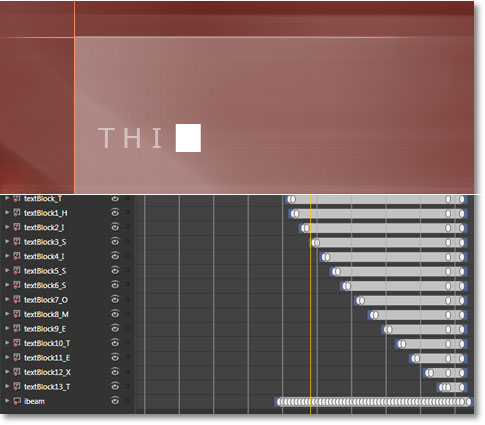
As one of the main aims of my little project was to animate the appearance of some kind of text message, I of course needed to add some text. I came up with the fantastically original and witty line, 'This is some text'. I did want to letterspace this, but without seeing any option to do this in Blend, I began by crudely typing the line in a text block and interspersing each letter with a space. I wanted each letter to appear over a period of time and realised that this was tricky to do. If I tried to highlight one letter and setting the opacity to zero, the whole text block would take on that property. That does make sense, but it did mean I would have to create a text block per letter in order to get the effect I required.
The text was white, but I wanted it knocked back a little so I set the Alpha transparency to 50%. I then set the Appearance opacity for all the textblocks to 0% so that they wouldn't appear on initial load.
Animating the 'static'
So I now had some raw ingredients to work with. I decided I wanted the text screen to appear over time, so that initially you would be confronted simply by the background image. However, I felt it needed a little more of an introduction - something to suggest an interruption, a change to the scene as a message was about to appear.
I had set the opacity of the text to zero and I needed to do the same for the text screen. This way, the only thing that would initially be seen, was the background image.
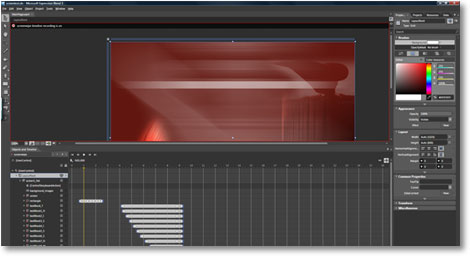
To create a kind of static 'wipe' effect running down the screen, I added a short rectangle, the width of the whole canvas. This was filled with a white gradient that faded to zero opacity in both directions. This I animated so that it simply ran down the screen, enlarged at one point, before returning to its initial size. I then fiddled with the easing for the latter keyframes to give it an erratic motion. The rectangle then fades to zero opacity at the end of the sequence.
Introducing the text screen
The whole animation takes place in just the one storyboard - the 'static' sequence, the appearance of the text screen, the ibeam and the text appearing. This I wanted to occur once the page had loaded. I used the 'ControlStoryBoard' action in the 'Behaviours' panel to start my storyboard.
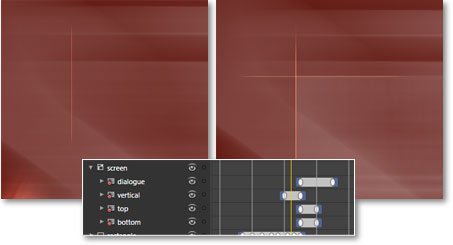
With the static working, it was time to introduce the text screen. I started this by making the vertical orange border resize from a zero height setting to its full height over a few keyframes. The horizontal borders and the screen itself appear in the same fashion afterwards, only their width is set from zero to their full width value.
Animating the text
Finally it was time to make the text appear. The text is revealed as the 'ibeam' square moves across. I simply moved the square across the screen over a few keyframes. I added keyframes between, setting the opacity from zero to 100% at regular intervals to create the flicker effect.
Cueing up the text to appear as the ibeam moved across took a bit of jiggling, but essentially, a keyframe was added, the letter was set to appearance opacity of 100%. A keyframe was then added immediately before it with appearance opacity set to 0% so that the text appeared quickly. Once the whole line was revealed, I then set a keyframe at the end and set the alpha opacity for all the letter textblocks to 100% so that the message appears clearly.
And that's that! The whole thing is a little slower than I'd like, but, although I'm sure there are more efficent techniques that would better achieve the result, I did get close to fulfilling my own brief!
Find out how a developer refined the code behind my work in Blend
Return to site